
Some notes on how to work with Sales batch entries:
This is particularly useful where the client is registered for VAT (or GST or Sales Tax) and you want to break out the tax amounts for reporting or tax return purposes etc.
We purposely do not offer the ability for accounts receivable / payable functionality. Our application is all about fast write-ups for simple clients who don't operate their own debtors/creditors ledgers (via accounting software) as such.
So, instead accountants will generally 'wash' these entries through a debtors account in current assets against various receipts posted there also - then usually make an adjusting journal entry at year end to bring the figure into line with outstanding invoices at the year end date.
It all depends on the client as to whether or not it is necessary to use this entry type and how you use it.
Import batch entries screen:
You'll notice when you hit the button 'Add Sales Batch' that you'll be brought to an import screen:
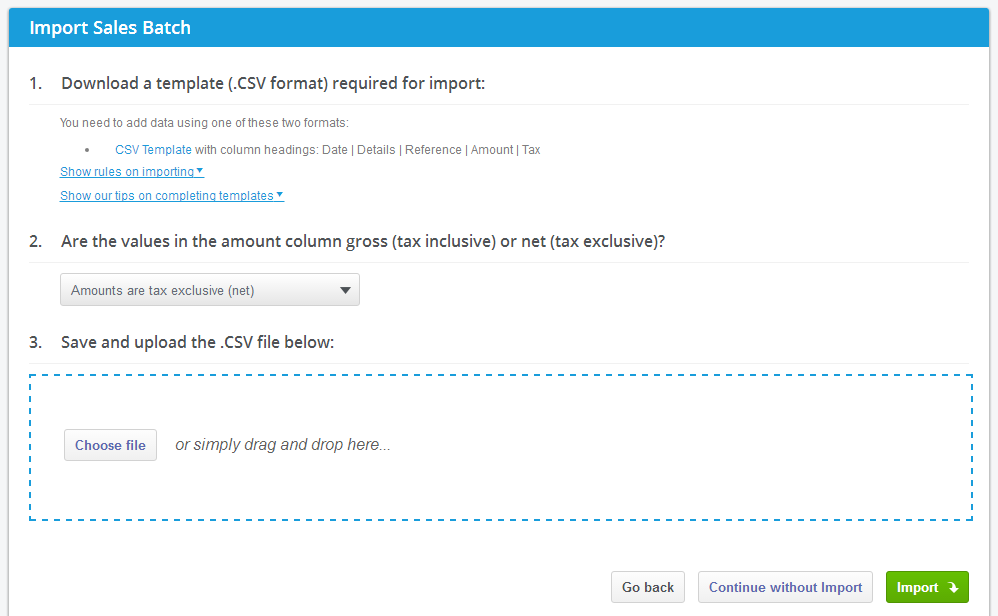
The reason we prompt you with an import screen is simply because excel is without doubt the fastest way to input lots of entries (whether copied & pasted from other sources or just typed), so if you're inputting lots of entries we suggest you do it this way using our simple template.
If you prefer to jump straight into the entry screen without import, simply hit:
 .
.If you are importing a file please follow the on-screen instructions and tips:

You must also select whether the values entered in the 'Amount' column are tax inclusive or exclusive. You may change this option later when in the entry screen itself, and it will recalculate it for you.
Sales batch entry screen:
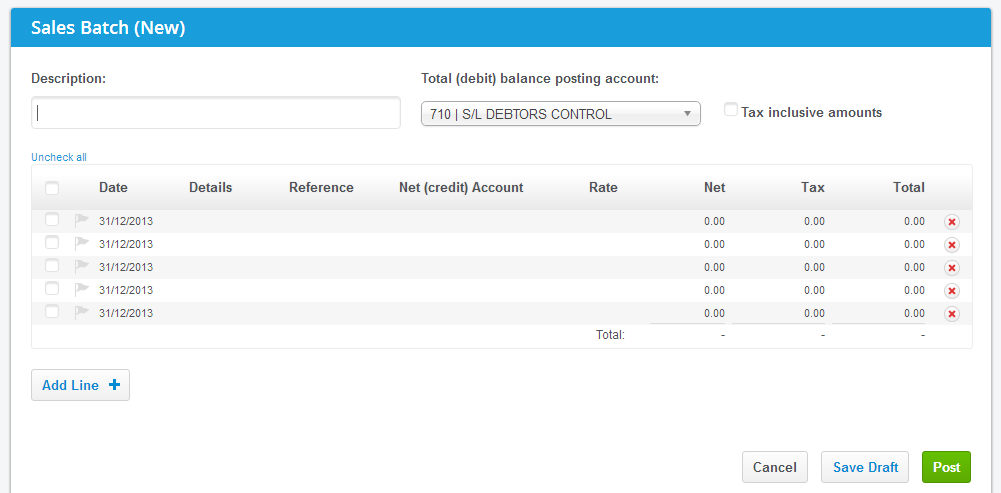
The sales batch entry screen has most of the same attributes as any other batch entry screen.
Some additional things to note:
-
Total (debit) balance posting account is set from Settings > Financial Settings and simply indicates where the total or gross values for each entry line will be posted
-
It is possible to change this per individual sales batch entry
-
Users tend to post these to some kind of debtors or accounts receivable account in current assets where they may also post relevant receipts from bank accounts
-
Tax inclusive amounts (checkbox) indicates how the tax amounts are calculated in the lines below. Click it to see the difference in how it calculates tax/net amounts:
-
If unchecked then the 'Net' cell becomes the editable field (amount entry field) and the tax is calculated on this amount (i.e. amount entered is exclusive of tax). The 'Total' cell will be locked in this case.
-
If checked then the 'Total' cell becomes the editable field (amount entry field) and the tax is calculated as included in this amount (i.e. amount entered is inclusive of tax). The 'Net' cell will be locked in this case.
-
Tax rates are set and can be added/edited in Settings > Financial Settings
-
You may enter your own tax value (with no % calculation) by selecting O/R - Override (allow manual entry) on any line
-
Account posting for each amount per line works as follows:
-
Net amount will be posted to the account selected from the Net (credit) Account dropdown for that line
-
Tax amount will be posted to the account set up in Settings > Financial Settings for Account designated for tax on sales
-
Total amount will be posted to the account selected above for Total (debit) balance posting account
See the Taxes Report help guide for information on how you can view breakdowns of these taxes for specific date ranges etc.